○ ssh root 접속제한

# vi /etc/ssh/sshd_config

       # PermitRootLogin yes
       라고 되어있는 부분의 주석을 해제하고 yes를 no로 고친다
       PermitRootLogin no

# /etc/rc.d/init.d/sshd restart

○ su 명령어 제한

# vi /etc/pam.d/su 에 6번라인

        # auth required /lib/security/$ISA/pam_wheel.so use_uid
        주석 제거
        auth required /lib/security/$ISA/pam_wheel.so use_uid

# usermod -G wheel [user]
        -> wheel 그룹에 속한 사용자는 su 사용불가

○ sudo 명령어 사용

# visudo

        맨 마지막 행에
        [user] (TAB) ALL=(ALL) (TAB) ALL
        추가

참고 : http://blog.naver.com/ssalleng21?Redirect=Log&logNo=130030195364

반응형
Posted by She쥐포s

2008. 1. 17. 13:44 Unix/HP-UX

telnet 접속시 오류

telnet localhost 입력 후 오류처리
- /etc/service 파일에서 포트 확인
- /etc/inetd.conf 파일에 telnet 서비스 확인
- /var/adm/inetd.sec 파일의
    telnet deny
    telnet allow
  부분 확인
- inetd 오동작의 경우
    inetd -c로 inetd 재시작
    inetd -l로 syslog로 로그남김

반응형
Posted by She쥐포s

o routing table 수동 편집시 사용

o 간략 정리
        # route add      net     destination netmask ________ IP 1
                   delete   host                                                0
    - Default GW 추가시
        # route add        default  ________ hop_count
                   delete

o 상세 옵션
- ipv4
/usr/sbin/route [-f] [-n] [-p pmtu] add [net|host] destination [netmask mask] gateway [count] [source src]
/usr/sbin/route [-f] [-n] delete [net|host] destination [netmask mask] gateway [count] [source src]
/usr/sbin/route -f [-n]

- ipv6
/usr/sbin/route inet6 [-f] [-n] [-p pmtu] add [net|host] v6destination [ / prefix] v6gateway [count] [source v6src]
/usr/sbin/route inet6 [-f] [-n] delete [net|host] v6destination [ / prefix] v6gateway [count] [source  v6src]
/usr/sbin/route inet6 -f [-n]

반응형
Posted by She쥐포s

2007. 12. 7. 17:39 Unix/HP-UX

hostname vs uname

o hostname
    - TCP/IP 통신에서 사용
    - set or display name of current system
    # hostname name_of_host
        -> reboot 전까지만 유효함
        -> 영구적으로 변경하기 위해서는 set_parms 이용
    - 이름포맷 : name_of_host[.x.y.z...]
    - ARPA and NFS Service

o uname
    - uucp 통신에서 사용
    # uname -S name_of_host
    - 이름포맷 : name_of_host
    - uucp와 관련 프로그램
    - 기타옵션
        없음 : -s와 같음
        -i : 장비의 유일한 ID 표시(display machine ID)(getconf)
        -n : 노드명(시스템명) 표시(display node name(system name))
        -r : OS의 현재 release 정보 표시(display the current release level of the OS)
        -v : OS의 이름 표시. 표준 HP-UX 시스템에서는 항상 HP-UX
        -m : 장비 하드웨어와 모델명 표시(display the machine hardware and model names)
               Itanium based system에서는 항상 ia64로 표시됨
        -i : OS의 버전 정보를 표시
        -l : display the license level of OS
        -a : 위의 option 모두 표시

    - 예
       uname -a의 결과가 다음과 같을 경우
      HP-UX myhost A.09.01 C 9000/750 2015986034 32-user license
        HP-UX : uname -s
        myhost : uname -n
        B.11.00 : uname -r
        A         : uname -v
        9000/889 : uname -m
        2015986034 : uname -i
        32-user license : uname -l

반응형
Posted by She쥐포s

2007. 11. 26. 14:02 Unix/Linux

SuSE Linux 관련

o SuSE Linux Networking 관련
http://openskills.info/infobox.php?ID=949

o SuSE Linux Firewall 관련
http://www.topology.org/linux/fwsuse.html#suse91

o SuSE에만 해당되는 사항은 아니지만 Open Skills라는 사이트
http://openskills.info/
반응형
Posted by She쥐포s

o 인터넷을 통해 데이터를 주고 받을 때 암호화여부를 확인하는 방법에 대한 설명

o 필요한 것
   - ethereal 또는 기타 패킷 캡춰 프로그램
   - 브라우저
   - 편집기

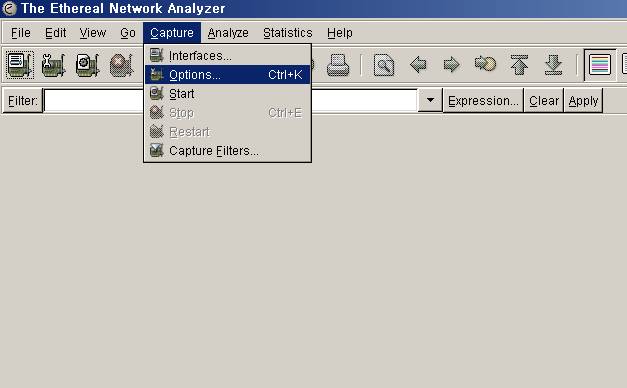
o 프로그램 메인화면

사용자 삽입 이미지

o 옵션 설정
사용자 삽입 이미지

o NIC(Network Interface Card) 선택 및 패킷 캡춰 시작
사용자 삽입 이미지

o 브라우저를 통한 로그인 실행
사용자 삽입 이미지

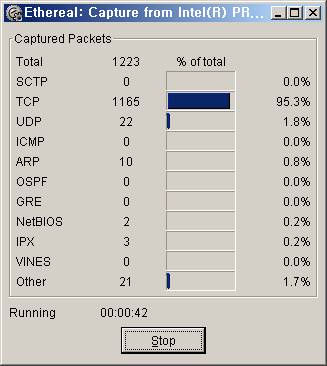
o 패킷 캡춰중
사용자 삽입 이미지

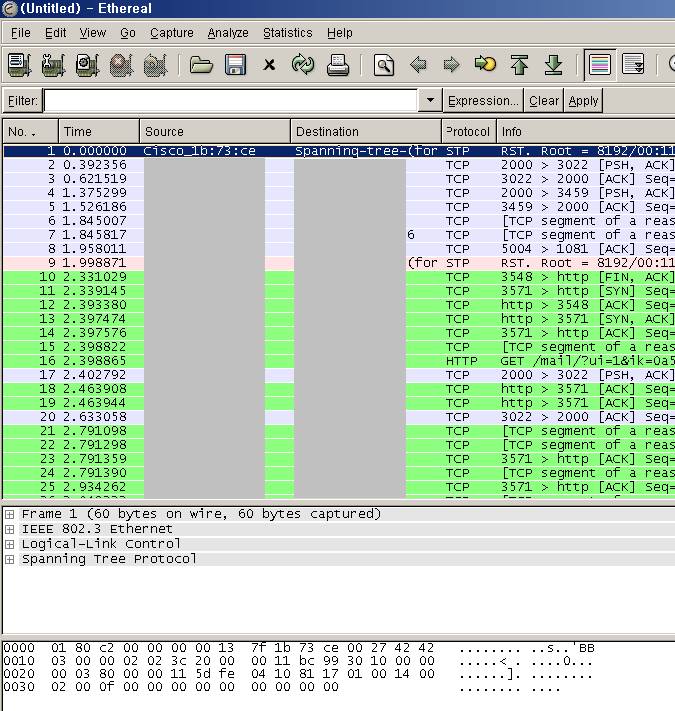
o 패킷캡춰 종료시 보여지는 화면
사용자 삽입 이미지

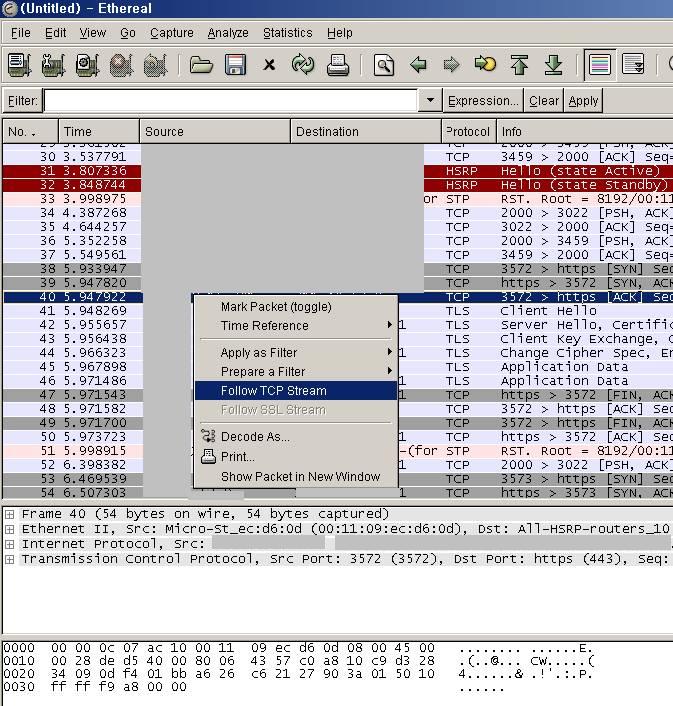
o 해당 통신 내용 선택하여 "Follow TCP Stream" 선택
사용자 삽입 이미지

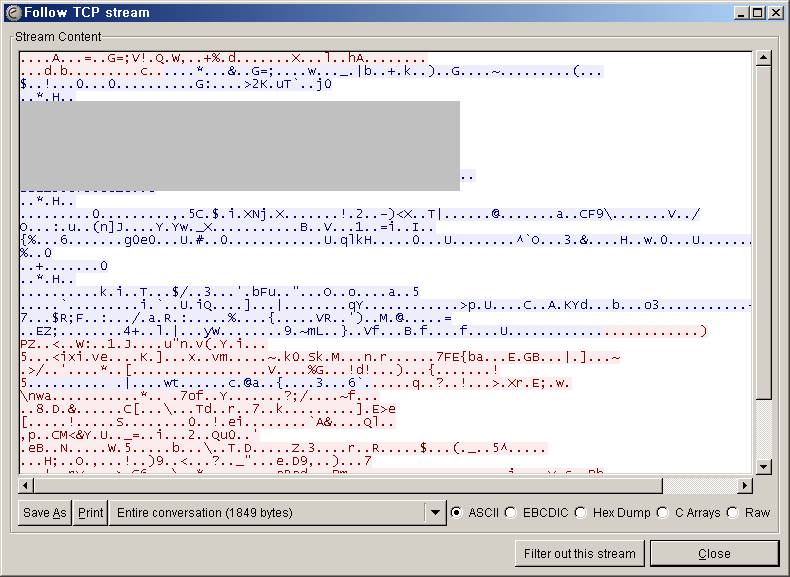
o 통신 내용 확인(ASCII로 보기)
사용자 삽입 이미지

o 입력한 내용이 존재하는지 확인
사용자 삽입 이미지

※ 만일 ID/PW가 암호화되지 않고 전송된다면 검색을 할 경우 평문 그대로 노출이 될 것이다.
※ 이를 통해 홈페이지 중요정보의 암호화 전송여부를 확인할 수 있다.
반응형
Posted by She쥐포s

2007. 11. 11. 01:24 Utility/Unix

Nagios

□ Nagios란 무엇인가?

Nagios®는 시스템 및 네트워크 모니터링 응용프로그램이다. 지정한 호스트와 서비스를 관찰하고
장애가 나거나 복구되었을 때 경보를 발령해준다.

Nagios는 원래 Linux에서 실행되도록 디자인되어 졌음에도 불구하고 대부분의 다른 유닉스에서도
잘 작동한다.

Nagios®의 많은 기능중의 몇가지는 다음과 같다.

- 네트워크 서비스 모니터링(SMTP, POP3, HTTP, NNTP, PING, 등)
- 호스트 자원 모니터링(프로세서 부하, 디스크 사용량, 등)
- 자신들의 서비스 체크할 플러그인을 쉽게 개발할 수 있도록한 간단한 플러그인 디자인
- 병렬화된 서비스 체크
- 다운된 호스트와 통신되지 않는 호스트의 탐지와 구분을 가능하게 하는 트리구조의 네트워크 호스트
  구조정의 기능(Ability to define network host hierarchy using "parent" hosts, allowing detection of
  and distinction between hosts that are down and those that are unreachable)
- 서비스 또는 호스트의 문제가 발생하거나 해결되었을 때 통보(이메일, SMS, 사용자정의 방법)
- 서비스 또는 호스트 이벤트의 사전 문제 해결시 실행될 이벤트 핸들러 정의기능
- 자동 로그 파일 순환
- 모니터링 호스트 이중화 지원
- 현재 네트워크 상태, 통보와 문제발생 이력, 로그파일등을 보기 위한 선택적 웹 인터페이스


□ 시스템 요구사항

Nagios를 실행하는데 필요한 것은 리눅스(또는 Unix)가 깔린 장비와 C 컴파일러 뿐이다. 네트웍을 통해
대부분의 서비스 체크가 수행되므로 TCP/IP를 설정해야할 것이다.

You are not required to use the CGIs included with Nagios에 포함된 CGI를 사용할 필요는 없다. 하지만 CGI를 사용하려 한다면 다음의 소프트웨어를 설치해야 할 것이다.

1. 웹 서버(되도록이면 Apache)
2. Thomas Boutell의 gd 라이브러리 1.6.3 이상 버전(statusmap과  trends CGIs에 필요)


□ 홈페이지

http://www.nagios.org/


반응형
Posted by She쥐포s

telnet, ftp 서비스 잠금

telnet과 ftp 잠금

시스템으로의 외부로부터의 접근(inbound access)이 필요하지 않다면 다음과
같이 하여 사용자들의 telnet 또는 ftp 접근을 거부하라.

vi /etc/inetd.conf

telnet 또는 ftp로 시작하는 줄을 주석처리하라. 파일을 저장하고 편집을 마쳐라.
이제 다음의 명령어로 inetd 데몬을 정지 후 시작하라.

/etc/rc.d/init.d/inet stop
/etc/rc.d/init.d/inet start

(기종에 따라 /etc/init.d 가 될 수도 있다.)

이제부터는 아무도 (외부)네트웍에서 여러분의 서버로 telnet과 ftp를 할수 없다.

※ 역자註 : 요즘은 inetd super deamon을 사용하였으나 요즘은 xinetd를 사용하여
위의 팁은 현실과 맞지 않을 수 있다. xinetd는 다음과 같이 disable = yes (사용안함)
또는 disable = no (사용)을 설정하며

# default: off
# description: XXXXXXXXXXXXXXXXXXXXXXXXXXXXXXXXXXXXXX
#      
service 서비스명
{
        disable = yes
        socket_type     = stream
        wait            = no
        user            = root
        server          = /usr/bin/rsync
        server_args     = --daemon
        log_on_failure  += USERID
}

다음의 명령으로 데몬을 재시작할 수 있다.

/etc/rc.d/init.d/xinetd stop
/etc/rc.d/init.d/xinetd start

-------------------------------------------------------------------------
=-=-=-=-=-=-=-=-=-=-=-=-=-=-=-=-=-=-=-=-=-=-=-=-=-=-=-=-=-=-=-=-=-=-=
                             UNIX GURU UNIVERSE
                                UNIX HOT TIP

                       Unix Tip 2323 - May 12, 2006

                   http://www.ugu.com/sui/ugu/show?tip.today
=-=-=-=-=-=-=-=-=-=-=-=-=-=-=-=-=-=-=-=-=-=-=-=-=-=-=-=-=-=-=-=-=-=-=

LOCK DOWN TELNET OR FTP

When inbound access isn't required into
a system deny users Telnet or FTP access
do the following:

vi /etc/inetd.conf

Comment the line starts with Telnet or
FTP.  Save the file and exit.

Stop and start the inetd daemon now by
following commands:

/etc/rc.d/init.d/inet stop
/etc/rc.d/init.d/inet start

(Your flavor may be /etc/init.d)

Now on nobody can telnet or FTP to your
server from outside network.

반응형
Posted by She쥐포s

2007. 11. 1. 18:58 Unix/Linux

Linux NIC 속도 설정

○ 하도 여러 사람들의 글이 많아서 내 나름 정리를 하고자... man page를 보고 끄적끄적

※ ethtool 사용법(주로 쓰이는 옵션 : 굵게)

# ethtool -s ethX [speed 10|100|1000] [duplex half|full] [port tp|aui|bnc|mii] [autoneg on|off] [phyad N] [xcvr internal|external] [wol p|u|m|b|g|g|s|d...] [sopass xx:yy:zz:aa:bb:cc] [msglvl N]

휴 길기도 하군..

※ 네트웍 설정에 넣기

/etc/sysconfig/network-scripts/ifcfg-ethX 파일에

ETHTOOL_OPTS="speed 1000 duplex full autoneg off"

추가

반응형
Posted by She쥐포s

리눅스 설정 방법


1. 네트워크 관련 설정 파일 설정

 ---------------------------------------------------------------------------

/etc/resolv.conf : nameserver

/etc/modules.conf : interface alias , duplex

/etc/sysconfig/network : default gateway , hostname

/etc/sysconfig/network-scripts/ifcfg-eth0 : ipaddr , netmask , broadcast

/etc/sysconfig/static-routes : static으로 설정되어 있는 routing table 정보

---------------------------------------------------------------------------


1. NICduplex상태 확인 및 설정

#ethtool eth0 : duplex및 속도 확인

#ethtool -s eth0 duplex full : duplex full로 설정

#ethtool -s eth0 speed 100 : speed 100으로 설정


/etc/modules.conf : 부팅시 설정하기 위해서 사용하는 file

alias  eth0  e100

alias  eth1  e100

options e100 e100_speed_duplex=4,4 // 1=10half;2=10full;3=100half;4=100full

* modules.conf에서 option duplex를 설정하는 방법은 NIC마다 다르므로 확인한 후 사용하여야 함.

위 예는 intel NIC를 설정하는것을 보인것임.


2. 수동으로 NIC 올리기

-기본값으로 UP / DOWN

#ifconfig eth0 plumb (사용)

#ifconfig eth0 up

#ifconfig eth0 down

#ifconfig eth0 unplumb(사용안함)


-값을 지정하여 올리기

#ifconfig eth0 211.41.84.222 netmask 255.255.255.0 broadcast 211.41.84.255 up


-인테페이스 사용/미사용

#ifconfig eth0 plumb (사용)

#ifconfig eth0 unplumb (미사용)


3. routing 수동 설정 방법

routing table에 설정할 내용

----------------------------------------------------

  NIC ip network주소에 대한 routing table

 local주소에 대한 routing table

 default gateway

 static routing table

----------------------------------------------------

#route add -net 211.41.84.0 netmask 255.255.255.0 dev eth0 : network주소에 대한 routing table등록

#route add -net 172.24.9.0 netmask 255.255.255.0 gw 172.24.64.1 dev eth1 : static route 등록

#route add default gw 211.41.84.234 dev eth0 : default gateway등록. /etc/sysconfig/network확인


#route add -host 211.41.84.111 gw xxx.xxx.xxx.xxx dev eth0 : 특정 호스트에 대한 routing table등록.

* netmask가 빠짐을 주의


/etc/sysconfig/static-routes : 그외 static으로 등록하여야 할 것(paran.com)

any net 172.24.9.0  netmask 255.255.255.0 gw 172.24.64.1 metric 1

any net 172.16.0.0  netmask 255.240.0.0   gw 172.24.64.1 metric 1

any net 10.0.0.0    netmask 255.0.0.0     gw 172.24.64.1 metric 1

any net 192.168.0.0 netmask 255.255.0.0   gw 172.24.64.1 metric 1


- 간단 요약 -

IP 설정 정보 확인
1. IP 주소
2. 넷마스크
3. G/W 주소
4. DNS 주소
5. 네트웍 주소


네트웍 설정
1. /etc/hosts

2. /etc/resolv.conf

3. 호스트 이름, 게이트웨이, 게이트웨이로 갈 장치 등을 설정
/etc/sysconfig/network 파일 수정
ex)  1  NETWORKING=yes
     2  HOSTNAME=kwsweb04
     3  GATEWAY=211.41.73.129
     4  GATEWAYDEV=eth0

4. 인터페이스 설정
/etc/sysconfig/network-scripts/ifcfg-eth0
ex)  1  DEVICE=eth0
     2  BOOTPROTO=static
     3  BROADCAST=211.41.73.191
     4  IPADDR=211.41.73.144
     5  NETMASK=255.255.255.192
     6  NETWORK=211.41.73.128
     7  ONBOOT=yes
각 인터페이스마다 설정한다.
5. /etc/rc.d/init.d/network restart
또는 간단히 service network restart


네트웍 설정 확인
# ping www.paran.com
# ifconfg -a | more
# mii-tool
ftp나 sftp 등으로 속도 테스트

※ 원문 : http://cafe.naver.com/quest4i/69
반응형
Posted by She쥐포s
이전버튼 1 이전버튼

블로그 이미지
She쥐포s
Yesterday
Today
Total

달력

 « |  » 2024.12
1 2 3 4 5 6 7
8 9 10 11 12 13 14
15 16 17 18 19 20 21
22 23 24 25 26 27 28
29 30 31

최근에 올라온 글

최근에 달린 댓글

글 보관함